The aim of this guide is to lead you through the steps of mastering fundamental breakdancing moves. Breakdancing is not only enjoyable and a good workout, but it’s also quite impressive when you’ve put in enough practice to excel. Anyone in decent physical condition can pick up breakdancing—whether you’re slender or muscular, short or tall. Plus, if you’re looking to improve your fitness, dancing is an excellent way to achieve that goal. Learning basic breakdancing doesn’t require much time, but refining it to look polished and sharp takes considerable effort. As long as you have a passion for dancing, you’ll thrive!
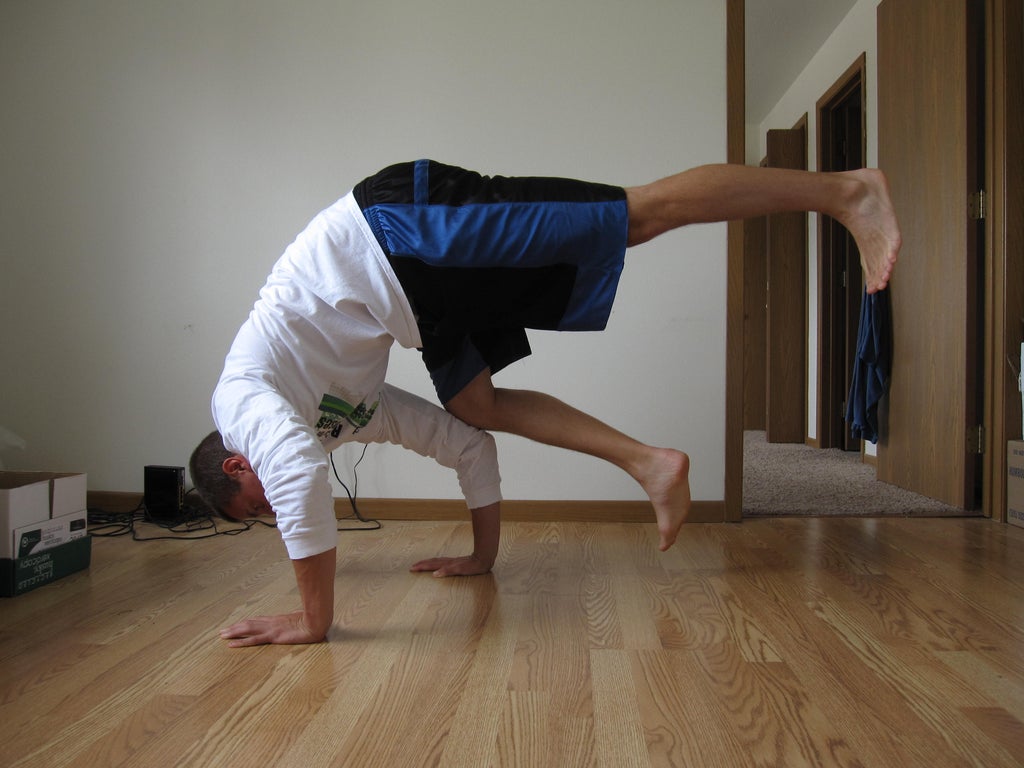
Step 1: Basic Footwork – Sixstep Starting Position: “Crabwalk”
Footwork in the context of breakdancing refers to the way dancers use their feet to move and transition between freezes and power moves. It’s a crucial element for:
- Maintaining balance and control: Footwork helps dancers stay grounded and stable during complex maneuvers.
- Creating momentum: Footwork can be used to build up speed and power for explosive breakdancing moves.
- Transitions: Smooth footwork allows dancers to seamlessly connect freezes, power moves, and spins.
Here are some specific types of breakdancing footwork:
- Footwork variations: These are fancy steps like the “charleston” or the “boogie woogie” that add style and flow to routines.
- Toprocks: These are footwork patterns performed while standing upright, often used to initiate breakdancing sequences.
- Downrocks: These are footwork patterns performed while in a lowered position, often used for transitions between freezes and power moves.
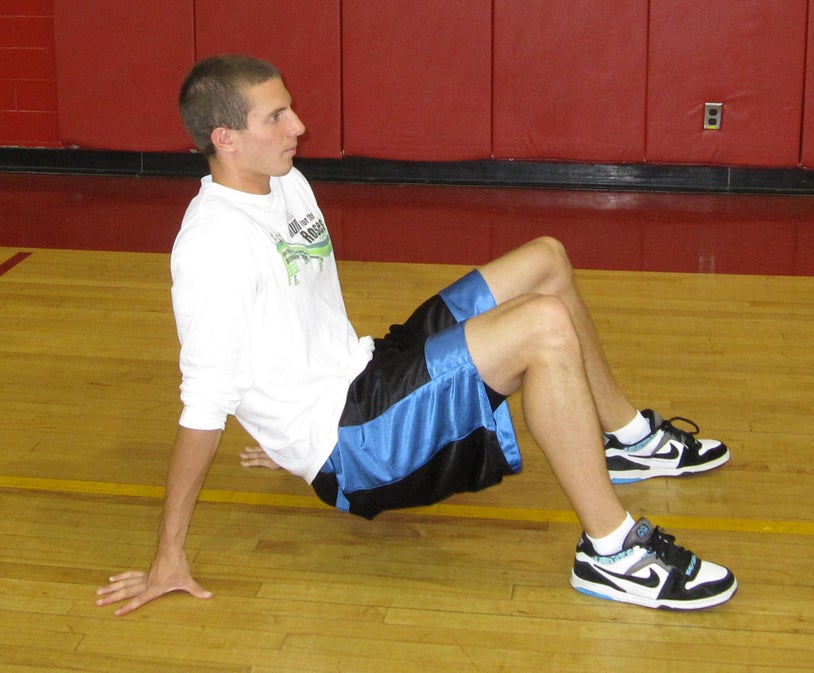
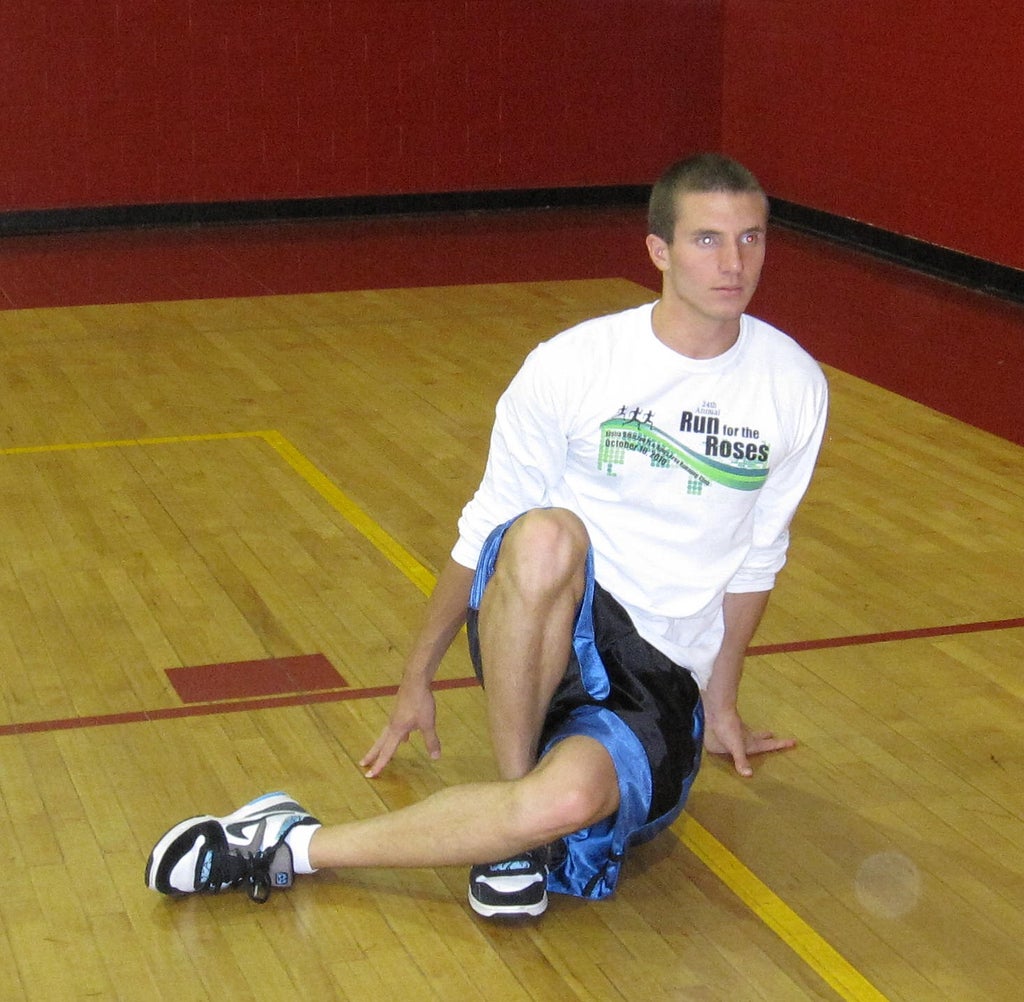
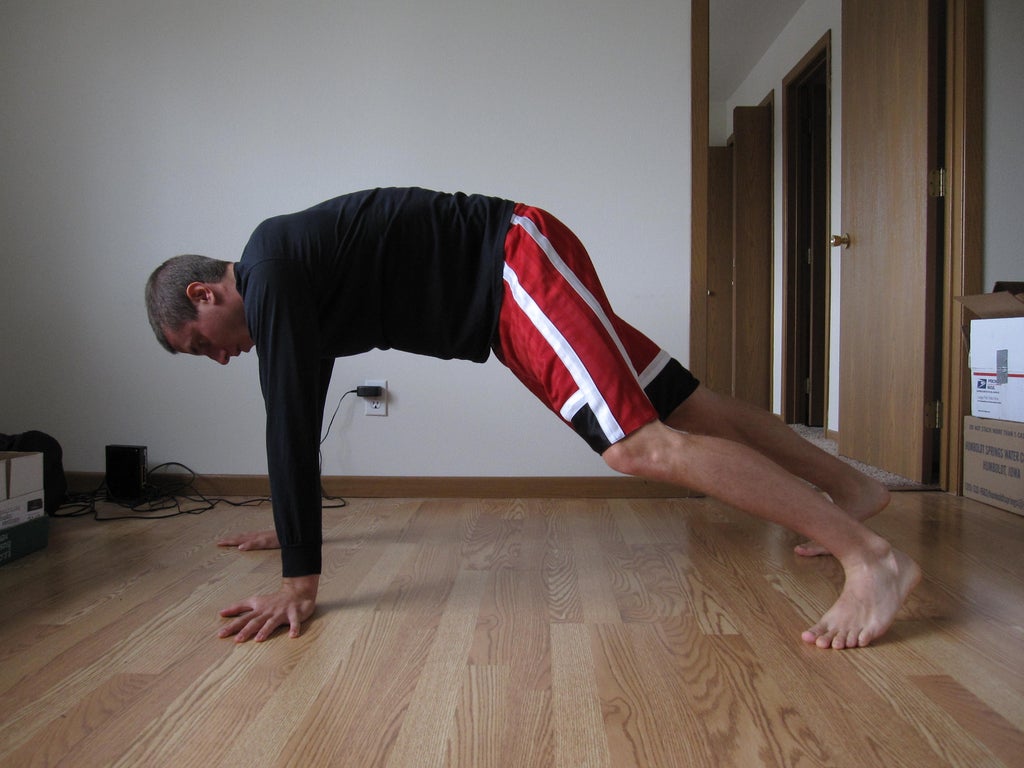
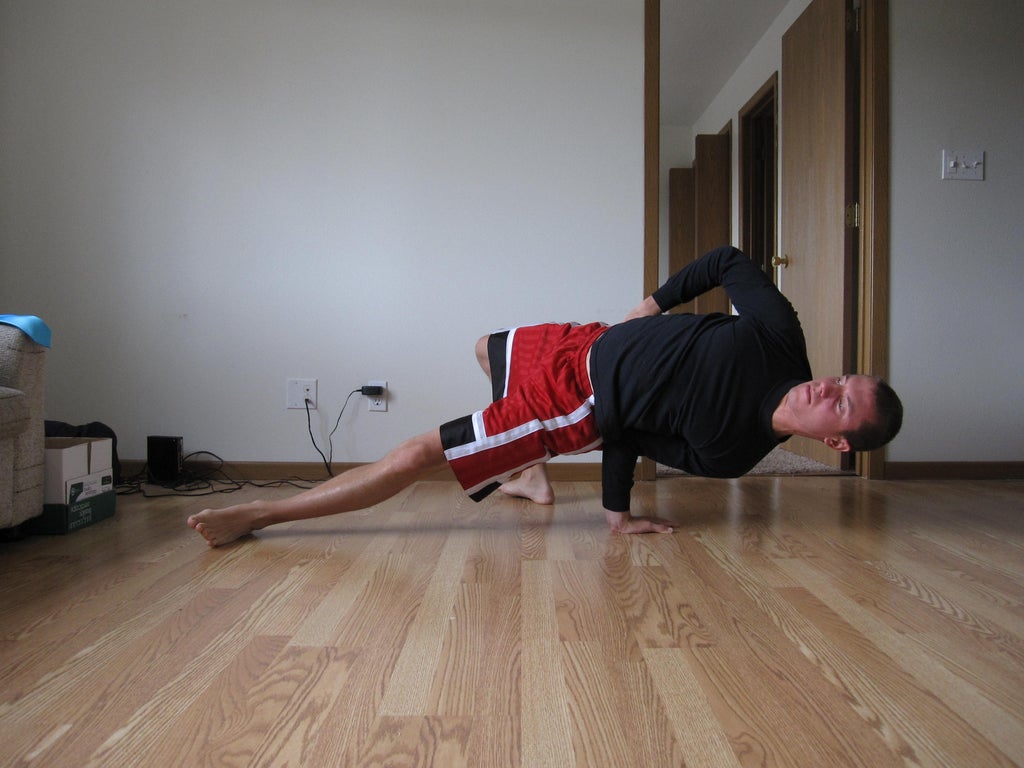
Begin in a crabwalk position, with your hands and feet on the floor and your buttocks slightly lifted. Keep your palms flat on the ground in front of you. As you progress, aim to elevate your sixstep by gradually reducing the contact of your palms with the floor, starting with only your fingers and the first row of knuckles, and eventually advancing to using only your fingertips.
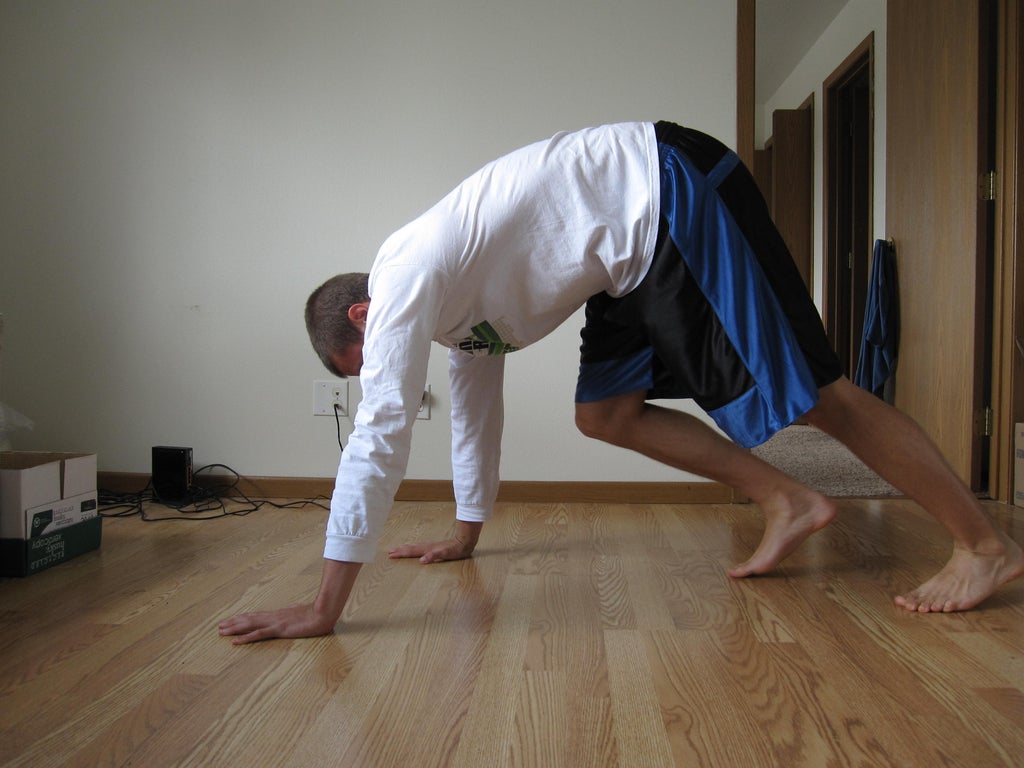
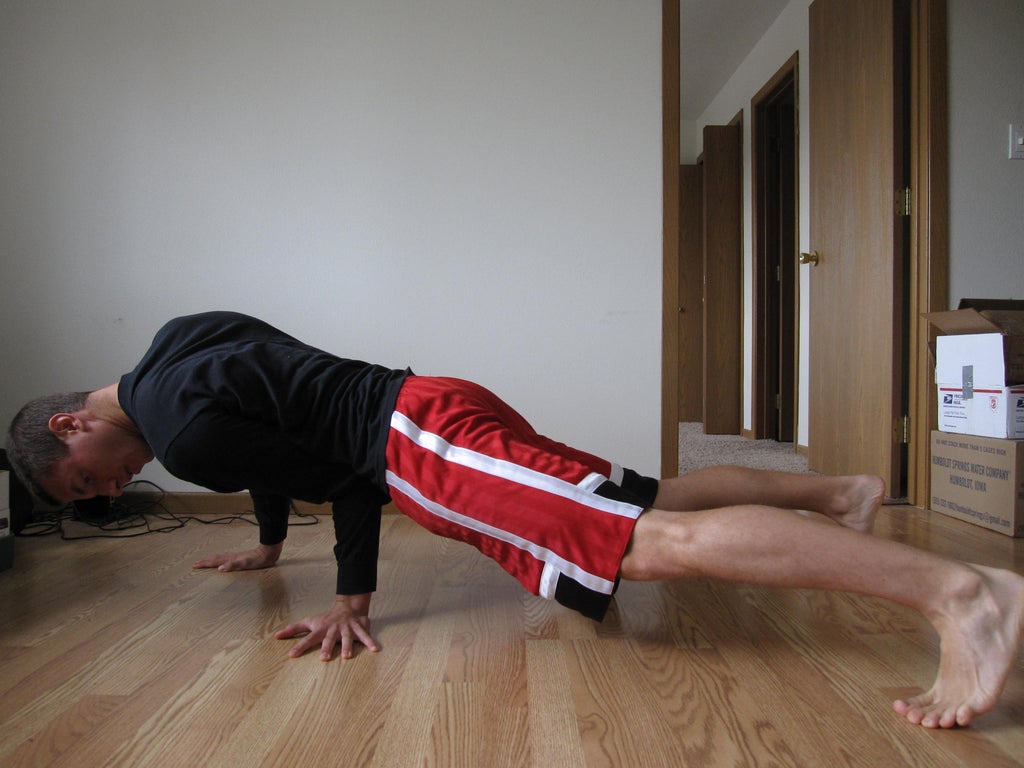
- Step 1: Right Leg Hook
Wrap your right leg around your left leg, positioning the inside of your right knee against the shin of your left leg.
- Step 2: Left Leg Back
Extend your left leg straight backward while simultaneously lifting your left arm.

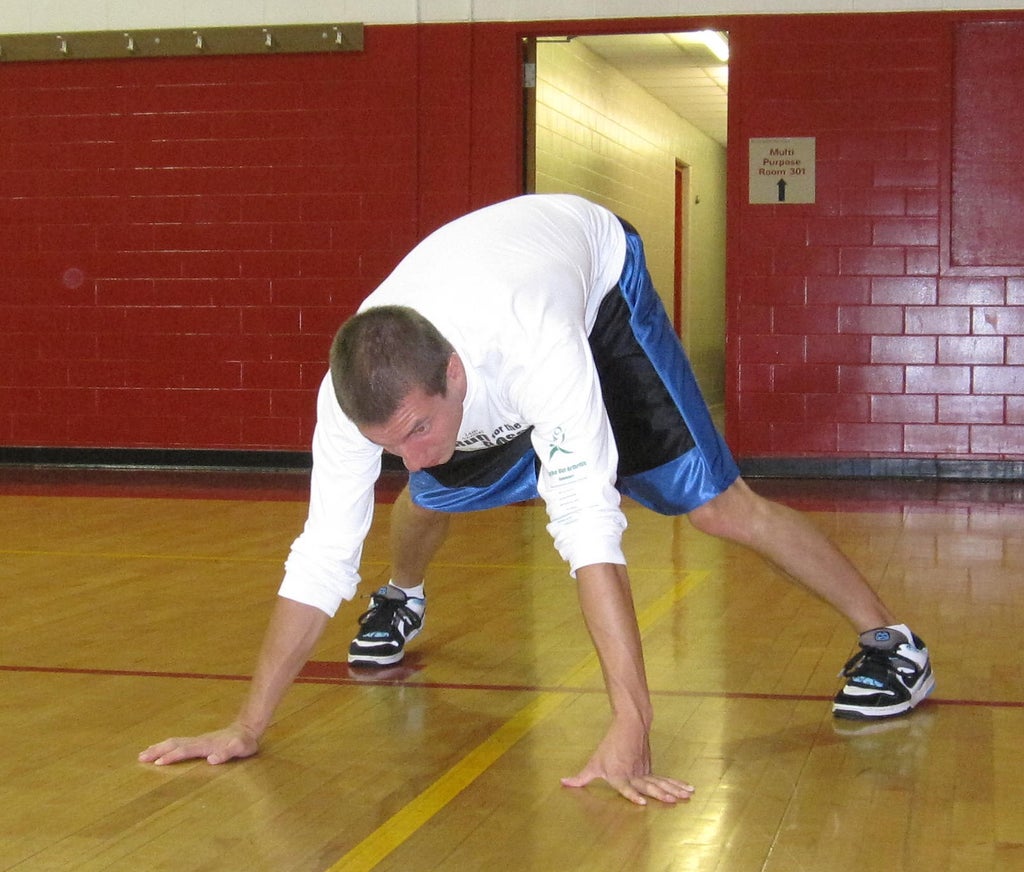
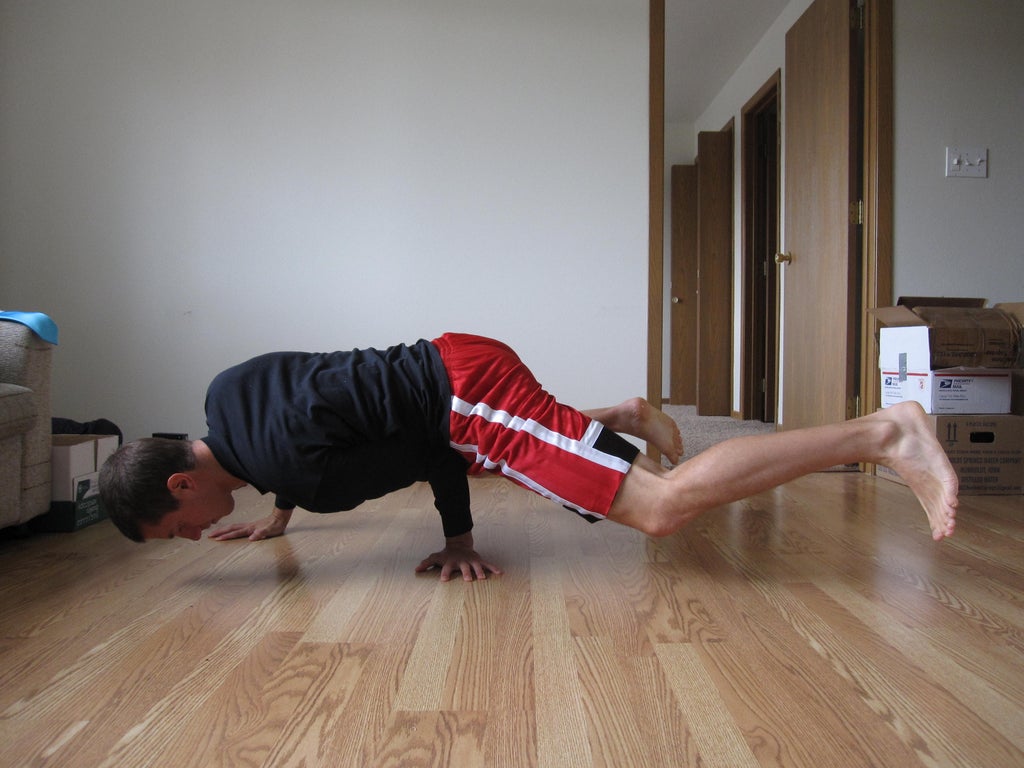
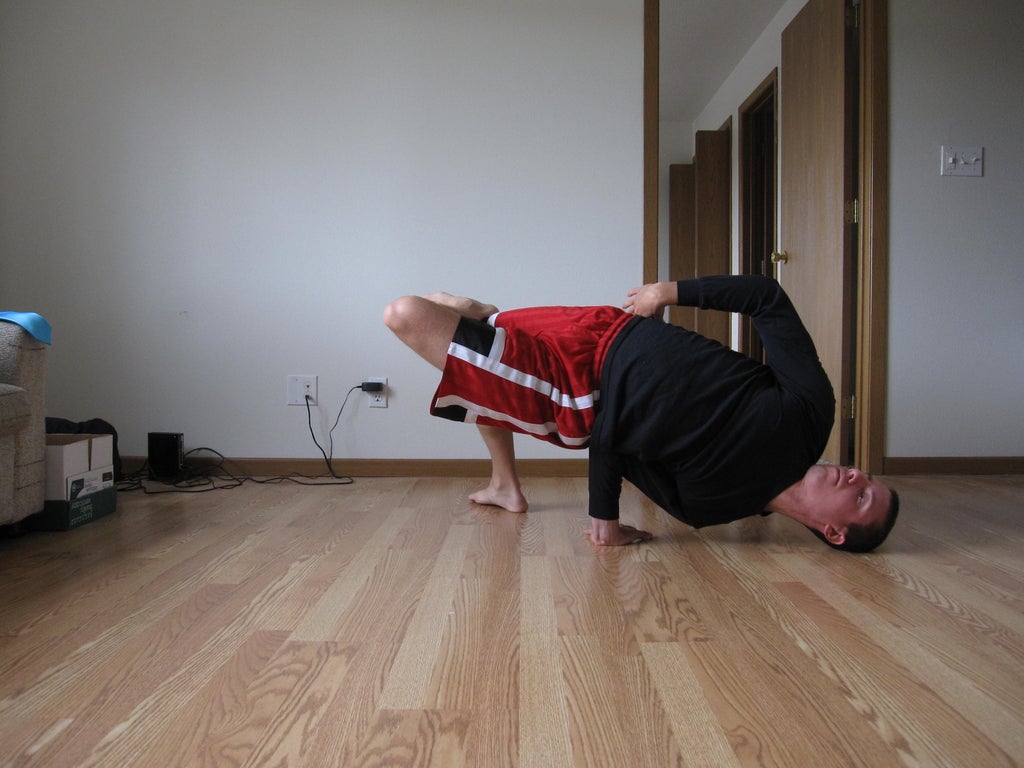
- Step 3: Right Leg Through
Slide your right leg under your body, between your right arm and left leg. Use your left hand for support by placing it to the side and slightly forward.

- Step 4: Left Leg Through
Continue by sliding your left leg under your body, between your right leg and left arm.
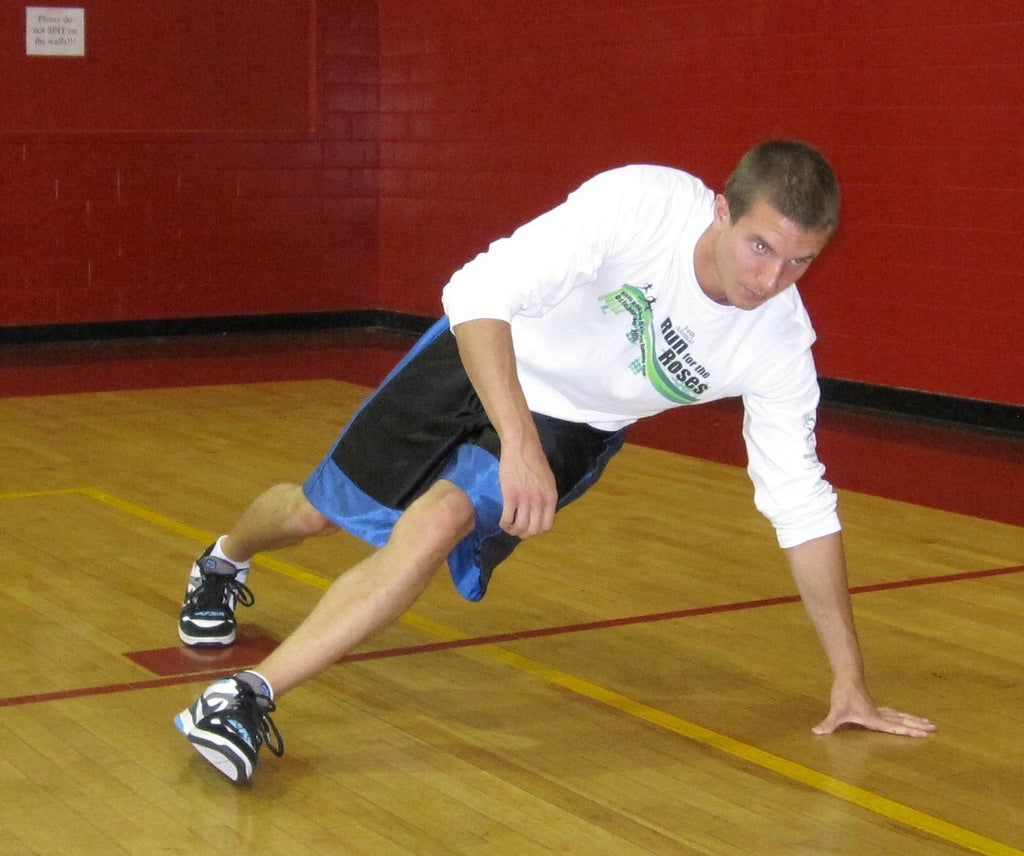
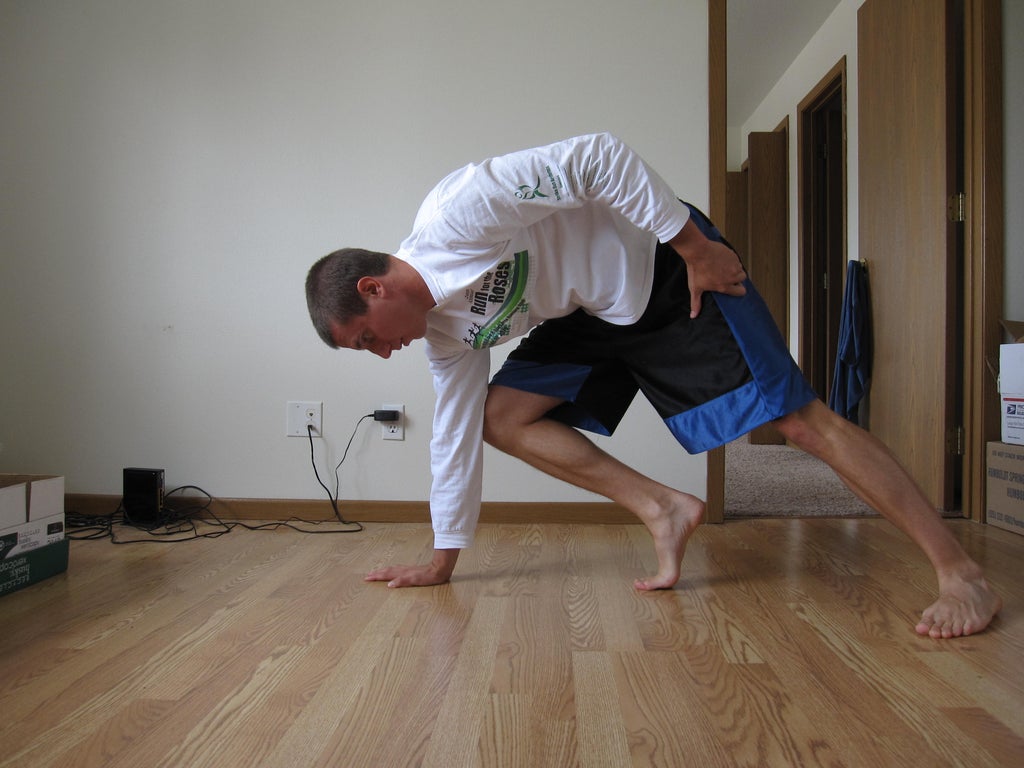
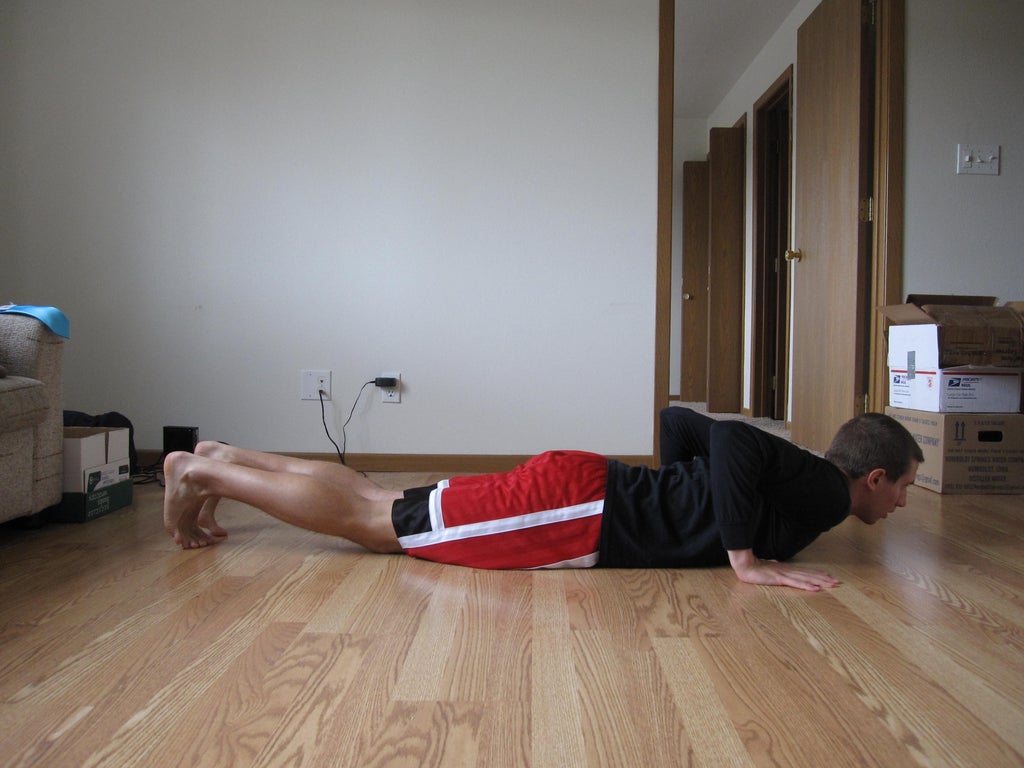
- Step 5: Right Leg Forward
Bring your right leg forward, positioning your right shin against the socket of your left knee.
- Step 6: Left Leg Unhook, Return to Start
Unhook your left leg from around your right leg, returning to the initial crabwalk position.
Focus on executing each movement correctly rather than speed. Mastery of the basics now will lead to sharper execution and increased speed in the future.
Step 2: Babyfreeze
A baby freeze is a foundational breakdancing move where the dancer balances their body low to the ground, supported only by their hands and head. It’s considered a beginner move because it requires minimal strength and focuses on technique and body control.
The babyfreeze is a straightforward freeze that can be easily transitioned into from a sixstep.
Starting Position: Begin with palms flat on the floor, feet also on the floor, and arch your back upward.
- Step 1: Position your right knee directly on top of your right elbow, near the end of the tricep muscle.
- Step 2: Lean forward slightly, placing weight on your right arm, and use your left arm for balance.
- Step 3: Extend your left leg behind you to help maintain balance.
Step 3: Handglide Freeze
The handglide freeze is another fundamental freeze that can be smoothly transitioned into from a sixstep. It’s also the starting position for more advanced power moves like windmills and handglides.
Starting Position: Begin with palms flat on the floor and feet on the floor, with your left hand’s fingers pointing to the left.
- Step 1: Lower yourself onto your left arm so that your forearm is perpendicular to the floor and your left bicep is parallel to the floor. Position your left elbow against the left side of your abdominal muscles. Your left arm will bear most of your weight at this stage.
- Step 2: Lift your legs off the floor, shifting them slightly to the left to adjust your balance. Use your right arm for additional stability.
- Step 3: Raise your right arm off the floor, balancing solely on your left arm. Shift your legs further to the left and lean your body slightly in that direction to maintain balance.
Step 4: Chair Freeze
The chair freeze, also sometimes called a jeffries, is a breakdancing freeze that requires good balance and core strength. It builds on the skills learned in the baby freeze and handglide freeze.
The chair freeze is another freeze that can be easily executed from a sixstep. It’s slightly more challenging than the handglide due to the awkward angle of the stab, but it looks impressive when performed crisply.
Starting Position: Begin by lying flat on your stomach on the floor, with palms flat and close to your sides, and elbows raised.
- Step 1: Without moving your arms, rotate over onto your left arm so that your left elbow is positioned against the side of your lower back, just below the hip bone but above the left buttock.
- Step 2: Lean forward and rest your head on the floor, while keeping your left foot flat on the ground.
- Step 3: Lift your left leg and place it on top of your right leg, resembling how someone might sit in a chair. Keep your right foot flat on the ground and your left foot resting on top of your right knee, forming a 90-degree angle.
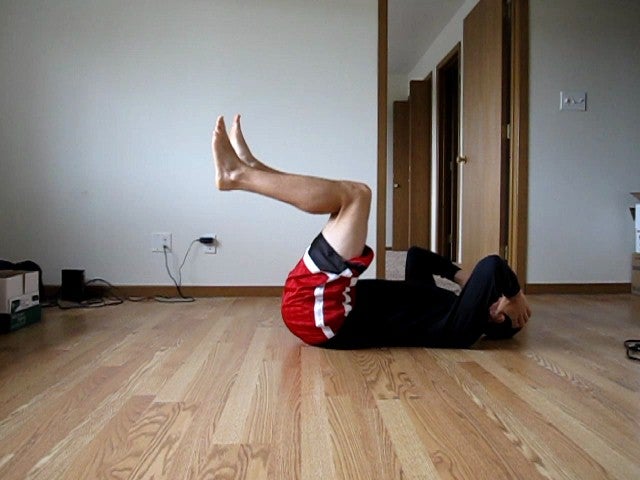
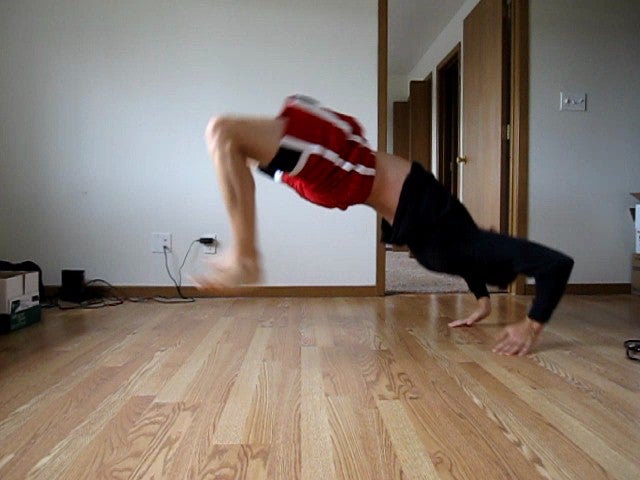
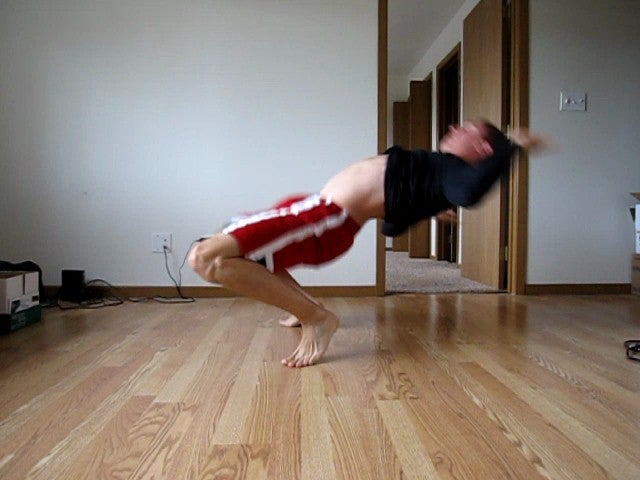
Step 5: Kip-up
The kip-up is primarily a gymnastics or martial arts move that provides an impressive and swift way to rise from the floor.
Starting Position: Begin lying flat on your back with your legs raised at a 90-degree angle, as if you’re preparing to do a crunch. Your hands should be positioned near your head.
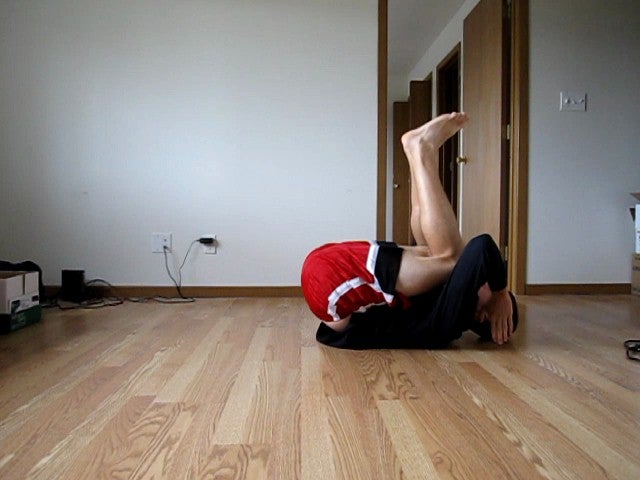
- Step 1: Roll back onto your upper back while bringing your knees toward your face. Touch your fingertips to the ground behind your head, preparing to push off. Imagine your body as a coiled spring, ready to propel upward.
- Step 2: Execute a powerful explosion with your legs at a 45-degree angle upward and outward, simultaneously arching your back and pushing off with your hands.
Warning: It’s crucial to exert all of your energy outward and upward during this movement. Holding back may result in falling onto your back, potentially causing discomfort. Your instinct might urge caution, but you must override this and commit fully to the motion.
- Step 3: Aim to land on your feet!

Conclusion
This guide has taken you through the steps of several basic breakdancing moves. As you practice these, focus on mastering the techniques slowly and then gradually increasing your speed over time. Simple moves executed cleanly have greater visual impact than advanced moves performed poorly. Ideal practice locations include gyms, dance studios, and surfaces like tile or linoleum floors. Breakdancing demands dedication and extensive practice to see improvement. If you have a passion for dancing and are committed to investing the time, you’ll excel!
Leave a reply