Are you ready to take your core strength to the next level? If you’ve been searching for a challenging yet rewarding exercise to add to your routine, look no further than the straddle L-sit.
What is straddle L-sit? The straddle L-sit is a variation of the traditional L-sit exercise. Instead of keeping your legs together and straight out in front of you, in a straddle L-sit, you spread your legs apart into a wide “V” shape while holding the L-sit position. This variation increases the challenge on your core muscles, hip flexors, and inner thighs, requiring additional strength and flexibility to maintain the position.
It’s often used as a progression for individuals who have mastered the basic L-sit and want to further enhance their core strength and flexibility. This impressive move not only targets your abs but also engages your entire body, from your shoulders down to your toes.
Whether you’re a fitness enthusiast looking to spice up your workouts or a beginner eager to learn a new skill, mastering the straddle L-sit can offer a multitude of benefits for your overall strength and stability. In this comprehensive tutorial, we’ll guide you through step-by-step instructions and tips to help you perfect your form and unlock the full potential of this advanced exercise.
Get ready to elevate your fitness journey with the straddle L-sit!
How to do straddle L-sit
Mastering L-sit on the floor first

Here’s a detailed guide to help you perfect your floor L-sit:
- Starting Position: Begin in a seated position with your legs stretched out in front of you. Place your hands on the floor close to your hips.
- Posture: Sit up straight, lifting your chest and lengthening your spine. Keep your back neutral, avoiding any leaning backward or forward.
- Arm Position: Straighten your arms completely and pull your shoulders back and down
- Core Engagement: Brace your stomach muscles as if you’re preparing for an impact. Pull your belly button toward your spine to engage your core effectively.
- Lifting Off: Push through your hands and lift both legs into the air. Keep your legs straight and point your toes, while ensuring your bum hovers just above the ground.
- Maintaining Form: Stay tall and avoid hunching your shoulders during the exercise. Hold the lifted position for as long as you can maintain proper form.
- Lowering Down: Slowly lower your legs back down to the floor with control.
By following these steps carefully, you’ll improve your form and strength in the seated position. Keep practicing to perfect your technique!
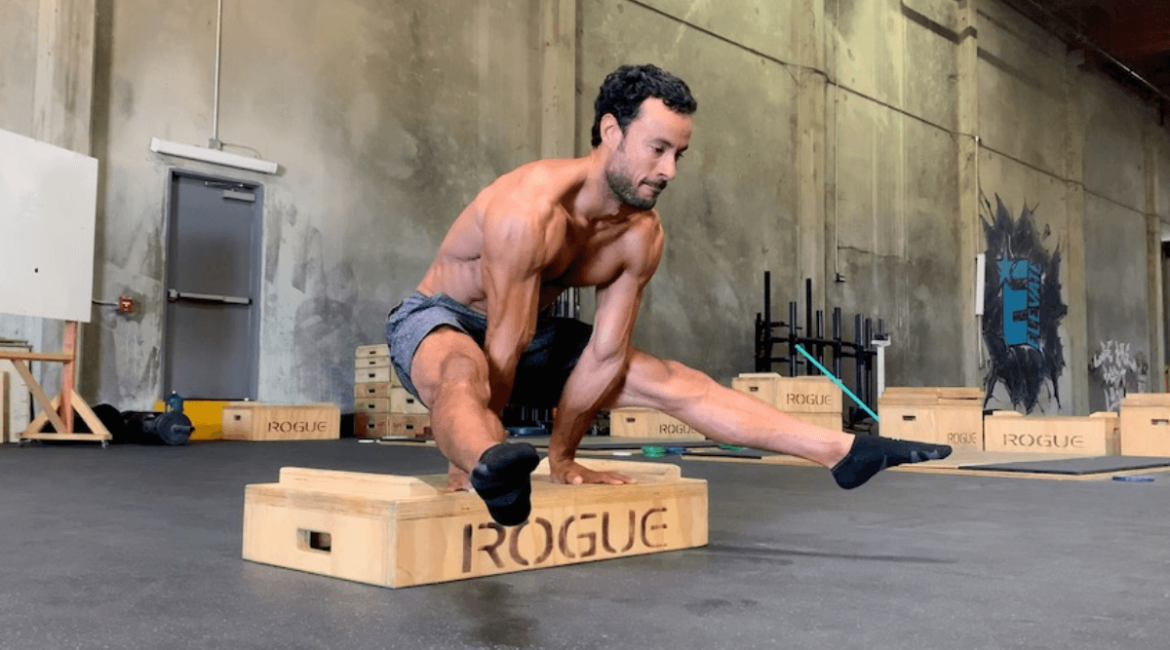
Guide to do straddle L-sit
Flexibility can sometimes be a bit of a roadblock when it comes to training for the straddle L-sit, especially if you already have a strong regular L-sit. Plus, if you’ve got long legs, you might find yourself needing a bit more space to stretch out in your room for the straddle L-sit.
Before you move on to the next progression, aim to hold each position for 60 seconds on each side:
One-Hand-Center, Foot Supported
- Place one hand in the center (right between your legs) and the other hand behind you.
- Push your bottom off the floor while keeping your feet in a straddle position.
One-Hand-Center, Outer-Foot Supported
- Put one hand in the center and the other hand behind you.
- Push your bottom off the floor and lift the leg that’s in between your hands.
One-Hand-Center, Inner-Foot Supported
- With one hand in the center or back, support one foot.
- Lift your bottom off the floor, focusing on lifting the leg that’s NOT between your hands.
Rolls to Straddle
- Place both hands in the center.
- Roll your body forward into a straddle position.
Straddle L on
- Parallel Bars (PB): Perform the Straddle L-sit on parallel bars.
- Rings Attempt: Perform the Straddle L-sit on gymnastic rings.

Supplemental dynamic exercises
Cossack Squats
Step 1 – Finding Your Stance
To begin, position your feet comfortably apart, ensuring you stand tall. Adjust the width of your stance based on what feels best for you and allows you to move through the exercise without any compensations.
Many find it helpful to hold a dumbbell or kettlebell at chest level in a goblet hold. This weight acts as a counterbalance, making the exercise feel easier. It helps you maintain an upright posture, shift your weight backward slightly, and move smoothly through the entire range of motion without tipping backward.
However, be mindful not to choose weights that are too heavy, as this may compromise your form. If you prefer not to use weights, you can achieve a similar counterbalance effect by extending your arms out in front of you.
Form Tip: Aim to position your heels approximately four feet apart as a starting point. Your toes can either point straight ahead or slightly outward, depending on what feels most natural for you. Adjusting your stance in this way can help optimize your stability and range of motion during the exercise.
Step 2 – Shifting Your Weight and Sitting
Now, it’s time to squat down into a deep squat position on one side while ensuring both heels remain on the ground. In this bottom position, your squatting leg should be fully flexed at the ankle, with the knee positioned over the toe. Meanwhile, the other leg remains straight, and your torso stays upright.
As you lower yourself into the squat, externally rotate the straight leg so that the toes lift off the ground while the heel remains firmly planted. This rotation of the foot helps shift some of the deep stretch from the adductors to the hamstrings, offering a more balanced stretch.
Feel free to experiment with the amount of foot turnout you use during this movement. Find a comfortable level of rotation that allows you to achieve the deepest squat position possible while maintaining proper form and stability. Adjusting your foot position in this way can help optimize the stretch and range of motion for your individual needs.
Step 3 – Standing Up
After you’ve reached the desired depth in your squat, it’s time to stand back up. To do this, push into the ground through the bent leg, using the strength of your muscles to lift yourself back up to the starting position. As you rise, return to standing tall with your feet positioned wide apart.
Next, rotate the straight leg back to its neutral position so that the toes return to the ground. This adjustment helps you regain stability and prepare for the next repetition of the exercise.
To complete the exercise, repeat steps one through four on the opposite side of your body. This ensures that both sides receive equal attention and helps maintain balance and symmetry in your workout routine. Remember to move with control and focus on maintaining proper form throughout each repetition.
Frog Pose

Step 1 – Starting Position – Plank Setup
Begin by getting into the plank position. Get down on all fours, placing your forearms and palms flat against the floor. Make sure your shoulders are directly above your elbows. Your hip joints should align above your bent knees.
Step 2 – Widening the Knees
Gradually widen your knees while maintaining the plank position. Point your feet and bent knees outward as you do so. You’ll start to feel a gentle stretch in your quadriceps and groin muscles as you widen your stance. This stretch helps prepare your body for the next phase of the exercise.
Step 3 – Grabbing Your Feet
Begin by stabilizing your body using one arm while reaching back with the other hand to grab the top of the corresponding foot. For example, if you’re using your right arm to stabilize, reach back with your left hand to grab the top of your left foot.
As you grab your feet, gently roll down onto the front of your torso while keeping your head raised. Ensure that your toes are facing straight ahead throughout this move.
Now, use the other hand to hold the top of the other foot. This means if your right hand is holding your left foot, your left hand should grab your right foot.
By grabbing your feet in this manner, you’ll effectively stretch your muscles while maintaining stability and control in your body. This position helps target specific muscle groups and promotes flexibility in the lower body.
Step 4 – Pushing Your Feet Towards Your Hips
Place both palms against the top of your feet with your elbows pointed upward at a 45-degree angle. Gently press down, pushing your heels toward your hips. This movement helps deepen the stretch in your quadriceps and hip flexors.
Step 5 – Breathe, Hold, and Release
Once you’ve reached the desired position, take a moment to focus on your breath. Inhale deeply and exhale slowly to help relax your muscles.
Hold this pose for about 30 seconds. If you find the stretch too intense, you can hold it for a shorter duration.
As you maintain the stretch, continue to breathe steadily. If you feel comfortable, use your exhalations to deepen the stretch slightly.
When you’re ready to release the posture, do so gradually.
Slowly lift your palms off your feet and return to the starting position or transition into another yoga pose.
By mastering each of these progressions, you’ll be well on your way to achieving a strong and stable straddle L-sit . Keep practicing and enjoy the journey! And if you want to learn more about straddle L-sit, check out this YOUTUBE video now!
Leave a reply