In the realm of calisthenics and bodyweight fitness, there exists a pinnacle of strength and control that captivates the imagination of enthusiasts and casual observers alike: the Straddle Planche.
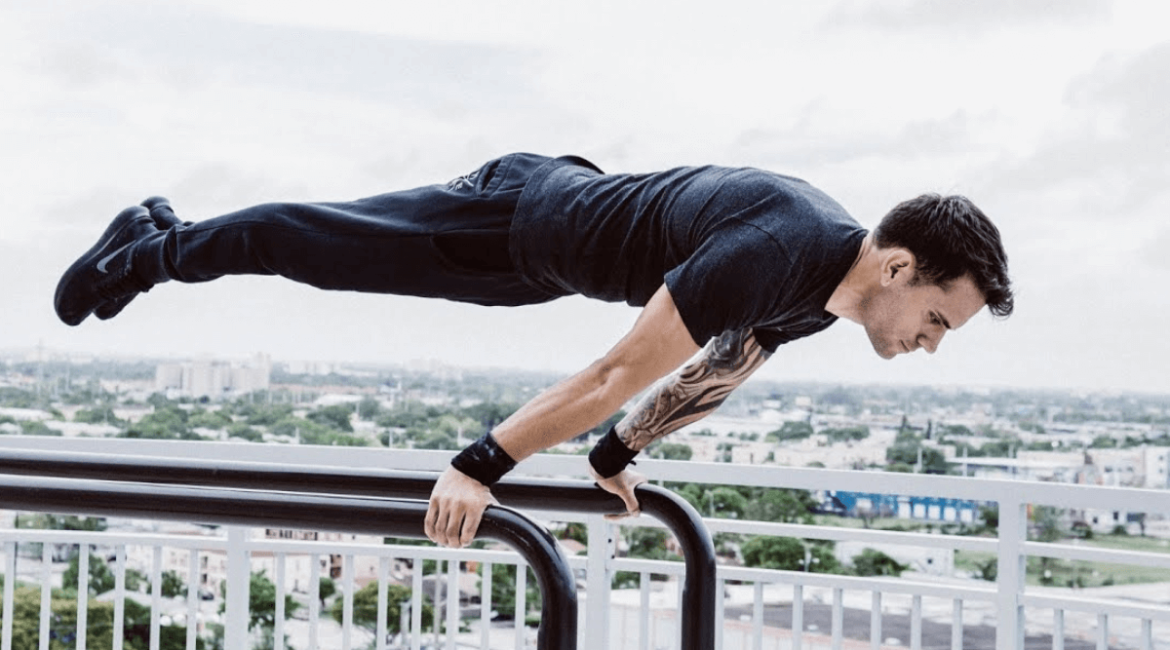
What is Straddle Planche? The Straddle Planche is a challenging gymnastic or calisthenics exercise where you support your body horizontally in the air, parallel to the ground, using only your hands as support. In this position, your body is extended and straight, and your legs are spread apart in a wide “straddle” position.
It requires a high level of upper body strength, core stability, and balance. Achieving and holding a Straddle Planche requires significant training and practice to develop the necessary strength and skill.
But let’s be real – achieving a Straddle Planche isn’t something you can master overnight. It’s a journey filled with challenges, setbacks, and small victories along the way. Yet, for those who embark on this quest, the rewards are immeasurable.
Not only does it showcase an extraordinary level of strength and control, but it also represents a profound connection between mind and body, a testament to what humans are capable of achieving through focused dedication and disciplined practice.
So, if you’ve ever found yourself mesmerized by the sight of someone effortlessly holding a Straddle Planche, or if you’ve harbored a secret desire to defy gravity yourself, then you’re in the right place.
In this comprehensive tutorial, we’ll delve deep into the intricacies of mastering the Straddle Planche, breaking down each step, offering invaluable tips and insights, and guiding you through the process from absolute beginner to straddle-planche-conquering champion. Get ready to embark on a journey that will not only transform your physique but also your mindset and approach to fitness. The Straddle Planche awaits – are you ready to rise to the challenge?
Prerequisite Straddle Planche

Severdal neccessary workouts
To get ready for doing a plank, it’s a good idea to start by doing the Tuck Plank for about 12 to 15 seconds. Doing this helps your muscles get used to the position, and it helps you get a feel for where your body is in space.
If you can do a Handstand and a Back Lever well, that’s really helpful too. It makes your elbows stronger and teaches you how to position them correctly.
Also, it’s important to have wrists that are strong and flexible. That way, they won’t hold you back when you’re trying to do a plank.
Warm up
Before you begin doing the Straddle Planche, it’s important to make sure your shoulders, elbows, and wrists are all warmed up. These parts of your body will be working hard, so it’s good to get them ready.
To warm up, you can do exercises like scapular push-ups, regular push-ups, pull-ups, Handstands, or Tuck Planches. These exercises help get your muscles ready for the work ahead. Once you’ve warmed up properly, you’re all set to start your Straddle Planche!
Equipment to have
When you’re doing the plank, your hands have to bear a lot of weight, which can be tough on them. That’s why we suggest using either low or high parallettes, depending on what feels best for you.
Whether your wrists are sensitive or not, having this equipment is really helpful. It’s not always comfortable to place your hands directly on the ground, especially if it’s cold or hot outside, or if the ground is dirty. Using parallettes can make your plank experience more pleasant and comfortable.
How to do Straddle Planche?
If you’re just starting out, there are some key things to keep in mind as you progress. Before you move on to the next level, it’s a good idea to position your hands outward. This helps prevent putting too much strain on them.
To go from one level to the next, you can try filming yourself. This way, you can check to see if your position is just right. So, let’s get started on your journey!
Step-by-step tutorial
Step 1
- When you’re squatting down, make sure to put your hands on the ground and line up your knees with your elbows.
- This helps you keep your balance better.
- Also, try leaning your shoulders a bit forward to find a good center of gravity.
As you practice more, you’ll find it easier to hold the position for longer and you’ll get better at finding the right balance points. Keep at it, and you’ll improve!
Step 2
Next, you’ll need to try the same move but without using your knees for support.
- Instead, keep your legs tucked inside your arms. This might feel harder at first, but don’t worry! Just keep practicing and you’ll get used to it.
- Your aim here is to increase the angle between your thighs and your torso.
- Try to move your thighs away from your torso as much as you can, aiming to reach a 90-degree angle.
The Plank is considered one of the toughest exercises in Street Workout, so as you progress through these steps, you should feel proud of yourself.
Step 3
After you’ve mastered step 2, the next challenge is to spread your thighs apart when you reach the 90-degree angle.
- Try to maintain this position for as long as you can.
- Once you can hold it steady, you’ll be ready to move on to the final step.
- To help with steps 3 and 4, you can use an elastic band placed around your pelvis.
This will assist you in staying elevated and give you a taste of what the final position will feel like. It’s a helpful tool as you work towards achieving your goal.
Step 4
You’re getting really close now!
- Your next task is to spread your legs apart
- Finally, squeeze them together as tightly as you can.
This step might be tough, but don’t worry, you’re capable of doing it! The more you practice this movement, the more you’ll improve and get closer to reaching the final step: achieving the full plank position. Keep up the good work!
Supplemental exercises
- Exercise 1: We’re kicking off the workout with the toughest part: completing 4 sets for as long as you can hold the position. You can start by either getting into the plank position from the floor or beginning from a handstand. We suggest coming down slowly from the handstand, as it allows for a smoother transition into the Straddle position and helps maintain proper form.
- Exercise 2: Next up, we’re moving on to Tuck Planche Push Ups, completing 3 sets for as many reps as you can manage. Switching between different variations, such as isometric holds, negative movements, and straight or bent arm work, lets you target various muscle groups effectively and ensures a well-rounded workout.
Let’s move on to the next exercises
- Exercise 3: We’re returning to the max Tuck Planche, pushing ourselves to the limit and strengthening our mental resilience. Your target is to hold the Tuck Planche for 45 to 60 seconds across all your sets. Even if it takes you 6 or 7 sets to achieve this, keep going until you reach your goal. This perseverance will help build your strength and determination.
- Exercise 4: To wrap up, we have the Facing Wall Handstand Push-Up, an excellent shoulder workout. Aim for 2-3 sets of as many reps as you can manage. This exercise will further enhance your shoulder strength and stability, which are essential for mastering the Straddle Planche.

Now that you have the complete routine to develop and enhance your Straddle Planche, it’s time to put it into action. Stay consistent and dedicated, and you’ll see progress in no time!
How to limit injuries while doing Straddle Placnche?
Having the right gear, like parallettes, is crucial to prevent injuries because it reduces the stress on your joints. Another way to stay injury-free is by strengthening your flexor and extensor muscles.
- Flexor muscles: These muscles are responsible for bending or flexing a joint. For example, when you bend your elbow to bring your hand closer to your shoulder, the biceps muscle is contracting, acting as the flexor.
- Extensor muscles: On the other hand, extensor muscles are responsible for straightening or extending a joint. For instance, when you straighten your elbow to push something away from you, the triceps muscle is contracting, acting as the extensor.
You can do exercises like push-ups on the back of your hands, practice using a false grip during pull-ups or slow muscle ups. Additionally, using an elastic band can help you stretch and strengthen your wrists. And with that, we wrap up this article on the Straddle Planche. Remember, safety first!
If you want to see a full journey to achieve straddle planche, don’t miss out this YOUTUBE video below!
Leave a reply