The muscle-up stands as an advanced movement in gymnastics circles. This challenging exercise, when executed properly, engages muscles throughout your upper body, offering a comprehensive workout.
Then, what is muscle-up? A muscle-up is an advanced calisthenics exercise that combines elements of both a pull-up and a dip. In a muscle-up, the athlete starts by hanging from a bar or rings and then uses a combination of pulling and pushing movements to transition from a hanging position below the bar to a position where the body is fully above the bar or rings, with the arms straightened.
This movement requires significant upper body strength, coordination, and explosiveness. Muscle-ups serve as a valuable tool for building muscle and elevating your training regimen to the next level.
While they can be performed on either a bar or rings, mastering the technique may require several attempts. Starting your muscle-up journey on the bar is often recommended for optimal results. So, now let’s jump in 2 ways you can do to perform muscle-up (on the bar and on the rings) for a perfect health!
Performing a muscle-up on the bar

Step 1: Position yourself
- To start, stand about 1 foot (30.5 cm) away from the bar.
- Raise your arms towards the bar at a roughly 45-degree angle.
Before attempting muscle-ups, make sure to warm up with light cardio or resistance exercises. This helps prevent injuries. You can try activities like jumping jacks, push-ups, or arm circles.
- Avoid standing directly under the bar like you would for regular pull-ups.
- Instead, standing at an angle helps you generate momentum, making the muscle-up easier to do.
Step 2: Grip the bar with a false grip
- Jump up towards the bar and grab it with both hands using a false grip instead of a normal one.
- If you’re not familiar with the false grip, practice it a few times before attempting a muscle-up.
- To form a false grip, keep your thumbs on the bar instead of wrapping them around it.
- Imagine gripping the edge of a ledge rather than holding a bottle.
- Flex your wrists and angle your hands slightly inward.
- Most of your hand and wrist should rest directly on top of the bar.
If you can’t immediately grab the bar with a false grip, you can start with a normal grip and switch to a false grip before attempting the muscle-up. Using a false grip engages the muscles in your upper body more effectively, rather than relying solely on lower body momentum to complete the exercise.
Step 3: Swing on the bar
- Swing back and forth on the bar to generate momentum.
- The forward leap motion should naturally create momentum, causing your body to swing back and forth while hanging from the bar.
- Begin the muscle-up when your body swings forward and reaches the peak position opposite to your starting point.
This swinging motion resembles a kipping pull-up, where you swing your body to propel yourself upward, allowing you to pull your chin over the bar. Practice kipping pull-ups to familiarize yourself with this momentum-based movement before attempting the muscle-up.
Although it may take a few swings to gauge the correct timing, aim to transition into the muscle-up after only a few swings to maintain momentum.
Step 4: Lift your gegs
- Once you sense the momentum shift, swiftly bring your knees towards your chest as if you’re doing a crunch exercise for your abs.
- This action helps your upper body lean back, making it easier to lift it upward.
- While it’s possible to perform a muscle-up without lifting your legs, doing so would make it more challenging and less beneficial overall.
- Lifting your knees engages more muscle groups in your abdomen and lower body.
Step 5: Bring your chin to the bar
- While bringing your knees towards your chest, use your arms to pull your chin towards the bar.
- Aim to reach as much height as possible during this movement.
- Try to lift your body at least as high as a standard pull-up, if not slightly higher.
- Maintain tension in your arms and avoid dropping back down once you reach maximum height.
- Keep your arms bent over the bar with your elbows locked.
If you’re swinging correctly, your legs and back will be swinging backward, facilitating the roll of your chest over the bar.
Step 6: Transition and extend
- Transition smoothly from the pull-up to a dip by leaning your shoulders over your hands as quickly as possible.
- This movement should cause your chest to rise above and over the bar.
- At this stage, you have the option to either keep your knees bent or start kicking your legs outwards.
Both approaches are acceptable, but kicking your legs out may enhance the momentum you’ve already generated, making the motion easier to complete.
Step 7: Press down and extend
- Complete the dip and the muscle-up by pressing down on the bar with both hands.
- This action naturally propels your body upwards and further above the bar.
- Continue until your arms are fully extended above the bar.
- Move at a pace that feels comfortable to you, focusing on bringing your elbows above the bar first.
- Then, gradually straighten your arms as much as possible without straining or causing pain.
Keep your core engaged throughout the movement.
At this point, you may need to adjust your grip height. Switch back from the false grip to the normal grip, wrapping your thumbs around the bar. This adjustment helps prevent slipping as you fine-tune the position of your arms and complete the muscle-up.
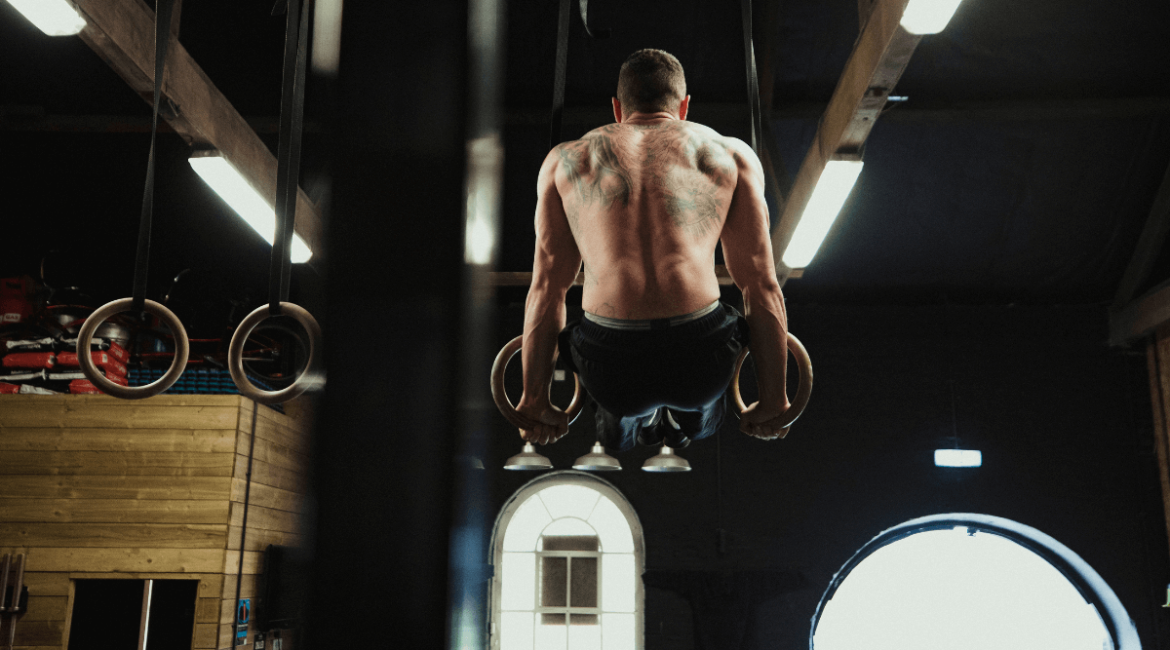
Performing a muscle-up on rings

Step 1: Position yourself
- Begin by standing directly beneath the rings.
- Make sure you’re centered between them and can reach up with your arms straight, elbows slightly bent, to grab the rings.
Unlike muscle-ups on a bar, you don’t need to angle your body to build momentum. Since the rings are flexible, lifting your upper body should feel more natural without extra swinging. However, it’s important to note that performing a muscle-up on rings is more challenging than on a bar due to the instability of the rings, requiring greater body control.
Step 2: Grip the rings
- Raise your arms and grab both rings using a false grip instead of a regular one.
- If you’re unfamiliar with the false grip, it’s a good idea to practice it beforehand.
This grip eliminates the involvement of your thumb and wrist joint, making it easier to raise your body higher and transition between movements. To use the false grip, rest your wrists on the rings and flex your hands down towards your elbows and pinky fingers.
Step 3: Hang from the rings
- Gradually straighten your arms and extend your legs in front of you as you hang from the rings, relying on your arms to support your weight.
- Your hands should be positioned above your head and spread apart at approximately shoulder-width.
While using the false grip, you may not be able to fully straighten your arms, but try to extend them as much as possible for ease in the next step.
Step 4: Pull yourself up
- Engage your arms to pull your body upward until your chin reaches the same level or slightly above the bottom portion of the rings.
- As you lift, aim to bring the rings inward towards your chest and body.
- You may need to point your elbows outward to maintain balance on the moving rings.
- Lean back slightly to position your face behind the rings, creating space and momentum for the transition to the dip phase of the muscle-up.
Step 5: Roll your upper body forward
- Once you feel stable, begin to lean your shoulders and chest forward, imagining each shoulder rolling over the top of each ring.
- This movement is crucial for getting your shoulders completely over the rings, shifting more of your weight above them and facilitating the transition into a full muscle-up.
- While you could rely solely on arm strength to pull your shoulders directly above the rings, leaning forward ensures that your weight is centered over your hands, preventing you from sinking back down prematurely.
- As your shoulders rise above the rings, start to turn the rings outward, allowing your hands to naturally spread apart to shoulder-width.
This turning action helps lift your body upward.
Step 6: Position your legs for assistance
- Simultaneously with lifting your upper body, begin to push your legs down while keeping them fairly straight.
- It’s not necessary to fully extend your legs; keeping them slightly bent at the hips with your feet in front of you can enhance balance and stability.
- If keeping your legs straight proves challenging, you may opt to lift your knees up to rest in front of your lower abdomen.
- Regardless of whether your legs are straight or bent, maintaining their position slightly in front of you facilitates the shifting of body weight necessary to move behind and over the rings.
Step 7: Press down on the rings
- Using your hands, push down on the rings until your entire chest and upper arms rise above the height of the rings, completing a full muscle-up.
- While your arms will start to straighten out, they should remain slightly bent at the elbow, with your hands spaced approximately shoulder-width apart.
- Although your chest will straighten somewhat, your shoulders and upper chest should still lean slightly forward to maintain proper form and engagement of the muscles.
- Focus on keeping your spine straight without allowing it to curve, and engage your core throughout the movement.
- As you pull into this final position, your legs will naturally drop straight down beneath the rest of your body.
And if you’re interested in muscle-up, don’t forget to check out this YOUTUBE video for a more detailed tutorial!
Author Profile
Latest entries
 Break DanceAugust 26, 2024ULTIMATE AIRFLARE TUTORIAL (2024) – COACH SAMBO
- Break DanceAugust 26, 2024BEST WINDMILL TUTORIAL – COACH SAMBO – HOW TO BREAKDANCE
- Break DanceAugust 26, 2024BEST AIRFLARE TUTORIAL – BY SAMBO – HOW TO BREAKDANCE (#6)
- Break DanceAugust 26, 20245 BEGINNER FREEZES – HOW TO BREAKDANCE – BY COACH SAMBO
Leave a reply